# Burst
Burst is the module that helps you to craft numerous sophisticated motion effects.
Please make sure you are comfortable with Shapes & ShapeSwirl before proceeding with this tutorial. Understanding those modules is crucial for understanding the
Burst.
# Burst
Burst is a higher order module that creates sophisticated visual effects in any part of the screen you want. You can think of Burst as a particle emitter that composes a bunch of ShapeSwirl's together, creating a circle of particles.
That's how it looks like by default:
const burst = new mojs.Burst();

document.addEventListener( 'click', function (e) {
  burst.replay();
});
Click somewhere to see
Just like with Shape, mojs takes care about all bootstrapping work, creates as narrow container for the burst as possible and positioning the effect for you.
From the technical point of view, Burst is just a main ShapeSwirl that holds a bunch of child ShapeSwirl's. Pictorially it looks like this:
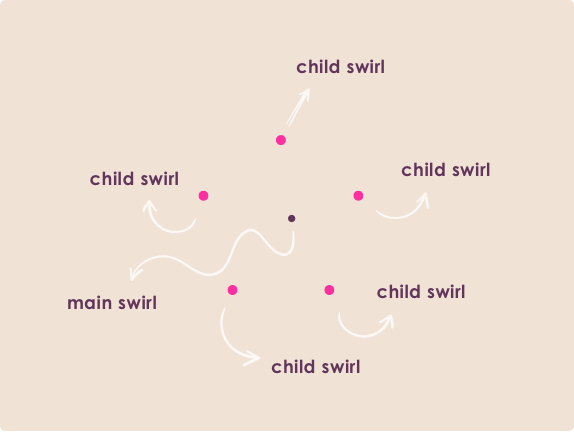
The main swirl has no shape nor any presentation properties and in fact, is 0 size by default completely unreachable for user's interaction pointer.
Another important note is that radius property (and radiusX/radiusY ones) has different meaning - it controls the radius of radial shape of particles:
const burst = new mojs.Burst({
  radius: { 0: 100 }
});
Click somewhere to see
There are few more properties that Burst implements over ShapeSwirl to control the radial shape behavior that particles compose. The first one is the count property that sets the amount of particles:
const burst = new mojs.Burst({
  radius:   { 0: 100 },
  count:    3
});
Click somewhere to see
The particles of the burst are evenly placed in a 360 degree circle, which you can narrow down with the degree property:
const burst = new mojs.Burst({
  radius:   { 0: 100 },
  count:    5,
  degree:   30
});
Click somewhere to see
Here above, we have a burst that has 30 degrees of sufficient place for particles.
It is very important to note here that since the main swirl of Burst module has no actual shape - it has no style attributes that define shape's presentation - all of them among which are the stroke or strokeWidth or fill are completely useless.
Also, the main swirl of the burst have no tween related properties like delay or duration, the later one gets computed automatically regarding the duration of the particles.
Nonetheless, all properties that control shape position, parent and opacity are present:
const burst = new mojs.Burst({
  radius:   { 0: 100 },
  count:    7,
  rotate:    { 0: 90 },
  opacity:  { 1: 0 },
});
Click somewhere to see
To recap, the main swirl of the Burst has no style attributes because it has no shape, furthermore it has no tween related properties like duration which is computed from the particles duration. But Burst has all the other properties, most of them regarding position, opacity, parent etc. You can always use the Burst API as the reference.
But Burst won't be much interesting unless we can control child particles, right?
# Children Options
You can control children options with the children object property:
const burst = new mojs.Burst({
  radius:   { 0: 100 },
  count:    5,
  degree:   30,
  children: {
    fill:       { 'magenta' : 'cyan' },
    duration:   2000
  }
});
Click somewhere to see
I have some good news for you - you already know Burst's syntax! Confusing claim? Nah! If you are familiar with Shape and ShapeSwirl modules - you know the Burst. That's because the Burst is nothing than just a ShapeSwirl that holds child ShapeSwirls, remember? This means you can put any property of ShapeSwirl to the children object, go try:
const burst = new mojs.Burst({
  radius:   { 0: 100 },
  count:    5,
  children: {
    shape:      'polygon',
    fill:       { 'cyan' : 'yellow' },
    radius:     20,
    rotate:      { 360: 0 },
    duration:   2000
  }
});
Click somewhere to see
Actually Burst gives you even more control over each child, allowing you to specify property for each of them explicitly. These two techniques are called Stagger Strings and Property Maps.
# Stagger Strings
Stagger Strings were designed to express continuous numeric values with some defined step (see delay property on children):
const burst = new mojs.Burst({
  radius:   { 0: 100 },
  count:    10,
  children: {
    shape:      'polygon',
    points:     5,
    fill:       { 'cyan' : 'yellow' },
    rotate:      { 360: 0 },
    duration:   2000,
    delay:      'stagger(0, 100)'
  }
});
Click somewhere to see
The first parameter in stagger function is the start value, all subsequent steps will be added to that start value, that is optional; If you just write stagger(25), it will mean to stagger with step of 25, starting from 0.
In the demo above, that's exact the same circle as in the demo before, but we have staggered the delay property so it looks rather spiral now.
Every numeric value can be expressed with stagger stings. Also, they can contain randoms (see the delay property in children):
const burst = new mojs.Burst({
  radius:   { 0: 100 },
  count:    10,
  children: {
    shape:      'polygon',
    points:     5,
    fill:       { 'cyan' : 'yellow' },
    rotate:      { 360: 0 },
    duration:   2000,
    delay:      'stagger( rand(0, 200) )'
  }
});
Click somewhere to see
We have staggered the delay with random function in interval of 0 to 200.
TIP
If you run the .generate() function before playing your burst, all random values will be recalculated for each time you play the burst. Like this:
burst.generate();
burst.replay();
# Property Maps
Property Map was designed to express sequential values. You can use it to generate values that repeat over and over but are mapped to children length. Basically, it is just an array that maps its values to children regarding child index with mod function. So if you have a property map with 3 values and burst has 5 children, then the 4th and 5th items will receive the 0th and 1st values from the map respectively:
const burst = new mojs.Burst({
  radius:   { 0: 100 },
  count:    5,
  children: {
    shape:        'circle',
    radius:       20,
    fill:         [ 'deeppink', 'cyan', 'yellow' ],
    strokeWidth:  5,
    duration:     2000
  }
});
So starting from 12 o'clock clockwise, the 5 childrens fill properties get values of deeppink, cyan, yellow and then again starting from the beginning of the property map - deeppink, cyan ( [0],[1],[2],[0],[1] ).
Property maps work with any property and property forms, in fact, that's just a prism (or multiplexer) that feeds children with properties by virtue of modulus function. Good aid if you want to set some property on child explicitly.
# then, tune, generate and play
You can make then state chains, tune and generate any Burst the same as you do with Shape or ShapeSwirl. Also, since the Burst is merely a ShapeSwirl under the hood, you can use any tween interface public method like play, setProgress, replay etc (click somewhere to see):
document.addEventListener( 'click', function (e) {
  burst
    .tune({ x: e.pageX, y: e.pageY })
    .setSpeed(3)
    .replay();
});
Click anywhere to see
# Recap
That's basically the burst, as I said you already know it so we won't go thru the children options again, instead, let's jog thru some use cases in the next section which will help as to gain some intuition over where and how to use the bursts. As you remember, - Burst is just a composition of a bunch of ShapeSwirls. There is the main swirl in the center of the burst but it has no visual shape. Also, it has no tween properties and its durations is calculated regarding the duration of the children. All child swirls use the main one as a parent. You can set properties of children with the appropriate property. Please, use the Burst API as the reference.
# Use Cases
Please note that the use cases section contains a lot of live code examples but the actual code samples are omitted for time savings and simplicity sake. The actual code is still available on the
Babeltab of the pens and I highly encourage you to read through and play with them while we will walk through this section. You can omit reading large demos code since it is probably unreadable (some Codepens can contain bundled code) or it could be too large to understand sparingly, but you can return to them later. I will leave a little (×) mark for you to indicate that you can skip reading the source code of the Codepen for now.
Burst, in similarity with Shape or ShapeSwirl, has numerous application fields, among which are motion graphics and UI-animations. In contrary to the Shape & ShapeSwirl tutorial, I won't split use cases to different entities but rather will try to do lot's of small demos, each with explanation comments. Hang tight!
Micro Animations
The first thing that comes to mind when I see the default burst - is the famous Twitter's fav animation (opens new window). Animations like that are usually called micro animations but I've used to call them micro celebrations because of their festivity.
Anyways, sequences like that are a cinch when you have the burst module in your hands. Here's how to do the main part of the sequence (click anywhere to see):
Link to pen (opens new window)
Here above, we have declared a burst with 5 particles (which is by default) with a burst's radius transition from 4 to 19. There are 2 strategies for bursts like that - one is to scale children down (by default), the second one is to animate strokeDashoffset on children which we have used here.
The next step is to add two more shapes to the scene - one circle with strokeWidth animation and a custom one - the star with elastic.out transition for the scale(click anywhere to see):
Link to pen (opens new window)
I love using the burst module over sprites because it turns out to be a way flexible over pre-rendered sequence of images, - you can play with easings, time, delay, colors etc. Also, you can even change shapes with no effort at all - for instance, if you want to add stars instead of lines (click anywhere to see):
Link to pen (opens new window)
Ok, let's redo the later Twitter love animation too. There is the burst part of the sequence(click anywhere to see):
Link to pen (opens new window)
The catch here is to use the in easing for scale property and the opposite out easing for particles position. Also, we have set the pathScale slightly smaller for "inner" particles. After that, we have defined a small degreeShift for each odd / inner particle. Then null value in the properyMaps mean that it takes the default value. For scale it's 1 and in degreeShift it's 0.
The next step is to add the circle shape and heart animations, almost identical to ones we have used in the Twitter fav scene (click anywhere to see):
Link to pen (opens new window)
And the last touch is to add all the color deltas, there are quite some of them (click anywhere to see):
Link to pen (opens new window)
That's basically the same micro confirmations that I've given you in the Shape & ShapeSwirl tutorial (×):
Link to pen (opens new window)
In the example above we didn't use the Burst module that much. But you can imagine that those effects are much easier with the Burst module. For instance the bubbles in the first part could be made like this:
Link to pen (opens new window)
Here we have the static radius of 25 on burst and 3 white particles. We've set a slightly random degreeShift and a delay on the children that eventually gives us the bubble like motion.
The second burst is super simple too:
Link to pen (opens new window)
As you can see, the second burst is almost the default one, we have only changed the main radius to 0 : 30. As for children, we tweaked the shape to a line value, and made the scaleX to fade out from 1 to 0.
The final touch is to add center circle and cross shapes:
Link to pen (opens new window)
The second part - the bubble fadeout effect is even simpler. For the Burst module, we just need to set degree to 0 so the particles will flow in one direction, then set isSwirl to true (Burst composes ShapeSwirls, remember?) on children thus particles will follow sine path. After that we need to slightly randomize swirlSize, swirlFrequency and pathScale parameters (click somewhere to see):
Link to pen (opens new window)
Just like with the previous example, the last touch is to add circle and cross transitions (click somewhere to see):
Link to pen (opens new window)
# Motion for the web
Let's recall the old "motion for the web" demo (×):
Link to pen (opens new window)
Note that the demo was made a while ago so it contains deprecated syntax.How many burst modules have you noticed in this demo? There are quite some actually. I think the most noticeable are collisions with the ground (click to see):
Link to pen (opens new window)
This one was made by virtue of degree: 180, childrens' radius of 7 and strokeDashoffset animation on particles.
There is another burst in that demo:
Link to pen (opens new window)
This one is simple too, the good one to practice basics.
Did you notice those meteors on the left of the letters? Those are Burst too. How? Well first you have a burst with 3 children:
Link to pen (opens new window)
Then you set degree of 0 so they all will fly to the same direction:
Link to pen (opens new window)
Hm, they kind of overlap, so let's shift them by staggering left and top properties on children, after that let's add some delay with help of property map:
Link to pen (opens new window)
Do you see that? Almost there. The last touch is to rotate the main swirl:
Link to pen (opens new window)
Pretty yummy detail.
What else have we got in the demo? Letters! That's how O letter was made:
Link to pen (opens new window)
As you can see, we've set the main swirl's radius and degree to 0 to put the child shapes in the one spot. Then we just have to slightly stagger delay on children.
The same technique for the other parts - vertical and horizontal lines:
Link to pen (opens new window)
Good. Let's refactor it a bit and make the vertical line start from the bottom, like firework launch:
Link to pen (opens new window)
That's better.
Blast all the things up
Let's move on. What else we can do with Burst? We can blast things up. I love blasting things up, do you? Recall this demo from the Shape & ShapeSwirl tutorial(×):
See the Pen mograph by LegoMushroom (@sandstedt) on CodePen.
Link to pen (opens new window)
Do you see that blast at the start? Let's make it together. First, you can notice these small particles (click somewhere to see):
Link to pen (opens new window)
Notice how we use pathScale and degreeShift properties to add randomness to the blast. The pathScale property defines how the length of the particle's path scales. The degreeShift property defines how much the particle will shift in its radial position in burst circle shape. So if a particle has degreeShift of 90, it will be shifted in radial shape by 90 degrees. Since pathScale and degreeShift both have random values and we generate the module on each user click - we always have the random blast pattern.
Let's add more details to the blast, for instance, another burst with large geometric shapes:
Link to pen (opens new window)
Feels rather messy. But it's fine for now, it should get straight when we will add more shapes:
Link to pen (opens new window)
And the last touch is to add "one spot" large burst of 3 items - one red, one white and one black:
Link to pen (opens new window)
Yum. I hope you love to blast things up too now. Notice we did it without a single repaint!
Modal blast
If you recall the next old demo, you probably can say now how it was made. How many modules does this blast compose (click close to see the effect) (×)?
Link to pen (opens new window)
The answer is 3 - 2 Bursts and 1 subtle circle in the middle.
Link to pen (opens new window)
The effect is a bit more modest than the previous one. As you can see, I haven't recreated exactly the same sequence here, but rather made a slightly different one.
The sleepy mole
OK. Enough distraction. Let's create something less straightforward. Recall this demo with the mole (×):
Link to pen (opens new window)
Can you count how much effects are bursts here? There are quite a few. The most noticeable is the effect that appears after the door shuts down - the 4 spots of dust. This one was composed with 4 bursts (one for each corner), let's start with just one for now:
Link to pen (opens new window)
How is it possible? Remember that the Burst composes ShapeSwirls, not simple Shapes so, if we set isSwirl to true, we will have sine paths. This is how you do 4 at once (click to see):
Link to pen (opens new window)
You can do the same `4 dust points effect` with just one declarative call if will use `Stagger` module, but that's a topic for the next tutorial.OK. Recalling the mole demo, what else did you notice? Probably confetti that appears when cube hits the floor. Right!
That's how you do the first large one:
Link to pen (opens new window)
The main catch here is to mimic the air flow by rotating the main swirl backward slightly. Then you have to create more bursts, each one is smaller than previous one and each of them should have a smaller delay.
Link to pen (opens new window)
What else have you noticed in the mole demo? Yep saliva that comes from the mole mouth when it teases. First, you want to make 0-degree burst, and rotate the main swirl downward, imitating that the air current which comes out of his mouth gets weaker:
Link to pen (opens new window)
Then add larger burst's radius, turn on swirl sine paths and randomize them with pathScale property:
Link to pen (opens new window)
At last, add random radius to children and mix direction of the swirls:
Link to pen (opens new window)
You can see that the Burst module is pretty flexible thus helps you to craft numerous sophisticated effects.
The dust trail
OK, let's recall another demo, remember this one from previous the tutorial? Did I notice that the dust trail effect is much easier with burst (×)?
Link to pen (opens new window)
As you remember, to create the dust trail effect, we first need to shoot the child swirls downwards to the ground with random children radiuses:
Link to pen (opens new window)
Now instead of multiple swirl modules which we have been using in the previous tutorial, we use just one burst - stagger expressions turn out to be useful! After that you want to create an overflow: hidden container and assign it as parent to the burst:
Link to pen (opens new window)
This time, we have used the Shape module as parent overflow constrain.
The last touch is to add the fading burst at the end and make the parent move to the left:
Link to pen (opens new window)
That's exact the same effect as we have made in the Shape & ShapeSwirl tutorial, but this time with just 2 Bursts! Bursts are fun, there is a little demo I've made with this dust trail effect (click to see):
Link to pen (opens new window)
That's it for Burst. We've touched only the surface of the possible effects that you can compose with this module, but that's a good start to convey the idea and APIs. Also, my friends from Codrops (opens new window) wrote an awesome post (opens new window) a while ago on the Burst matter, definitely check it out.
# Recap
Burst is the module that helps you to craft sophisticated motion effects with simple declarative calls. Technically, it is the main ShapeSwirl that composes a bunch of child ShapeSwirls forming the radial shape by default. mojs takes care about all markup bootstrapping and positioning of the module for you. The main swirl has no shape thus no presentation properties. The duration of the main swirl is calculated regarding duration of the child swirls. To control child swirls, pass the ShapeSwirl properties to the children property of the main swirl. You can find exhaustive API reference at Burst API section.
Burst is indeed an interesting module but, please don't overuse it. Your intention should be to guide and cheer users but not overwhelm them. Be cautious and think twice, if you feel that anyhow the effect you've done makes a visual noize rather than helps to solve a real problem, skip it entirely.
# Thank you!
I'm happy you've made it here! It was a long and intense journey, I hope you don't feel overwhelmed. I also humbly hope that these effect modules will come handy to you on your web development route. There are some more "effects" modules that will land to the mojs shortly so stay tuned. For any questions, catch me on Twitter @legomushroom (opens new window), ask a question on StackOverflow with #mojs tag, rise an issue on the GitHub repo (opens new window). You can help the project on GitHub (opens new window). {'Love ❤️.'}
Kudos to Jonas Sandstedt (opens new window) for his help in read proofing this tutorial!